Recently I came across this issue. I managed to install Windows 11 with a local account by applying the oobe\bypassnro trick. It worked like a charm in the past with Windows 11 22H2, 23H2 and 24H2 installation as far as I have tried. However, it seems this bug was patched by Microsoft and oobe\bypassnro not working in Windows 11 25H2.
Now the question: Is there any other methods I can try in order to install Windows 11 without a Microsoft account? Well, yes, there are alternative solutions available which we’ll mention in this article.
Fix: oobe\bypassnro not working in Windows 11 25H2
Option 1: Use the Audit mode
What it does: It boots the OOBE into Audit Mode and signs you in as the built-in Administrator so you can create a local admin account, install drivers, or run sysprep later.
Quick steps: At the first OOBE screen press Ctrl+Shift+F3. Windows will reboot into Audit Mode and drop you to the Administrator desktop. Create the local user there. Reboot to continue OOBE.
Caveat: Not all vendor images behave identically. However, it’s an official Microsoft-supported flow.
Option 2: Modify the Autounattend.xml during Installation
Create an unattended answer file that automatically skips OOBE and creates a local account.
This method works during installation, so you prepare the ISO or installation media with the answer file.
Key settings to include:
<SkipMachineOOBE>true</SkipMachineOOBE>
<SkipUserOOBE>true</SkipUserOOBE>
<HideWirelessSetupInOOBE>true</HideWirelessSetupInOOBE>
<UserName>Administrator</UserName>
<Password>
  <Value>yourpassword</Value>
  <PlainText>true</PlainText>
</Password>
Option 3: Use registry edits
If previous options didn’t worked, you can try this registry method.
You can use Notepad to create this file on your desktop or another folder: WinPE_BypassNRO.bat.
The following code you copy and paste to Notepad file:
Echo OFF
SETLOCAL
REG ADD HKLM\SOFTWARE\Microsoft\PCHC /V UpgradeEligibility /T REG_DWORD /D 00000001 /F
REG ADD HKLM\SYSTEM\Setup\MoSetup /V AllowUpgradesWithUnsupportedTPMOrCPU /T REG_DWORD /D 00000001 /F
REG ADD HKLM\SYSTEM\Setup\LabConfig /V BypassCPUCheck /T REG_DWORD /D 00000001 /F
REG ADD HKLM\SYSTEM\Setup\LabConfig /V BypassDiskCheck /T REG_DWORD /D 00000001 /F
REG ADD HKLM\SYSTEM\Setup\LabConfig /V BypassRAMCheck /T REG_DWORD /D 00000001 /F
REG ADD HKLM\SYSTEM\Setup\LabConfig /V BypassSecureBootCheck /T REG_DWORD /D 00000001 /F
REG ADD HKLM\SYSTEM\Setup\LabConfig /V BypassStorageCheck /T REG_DWORD /D 00000001 /F
REG ADD HKLM\SYSTEM\Setup\LabConfig /V BypassTPMCheck /T REG_DWORD /D 00000001 /F
REG ADD HKLM\SOFTWARE\Microsoft\Windows\CurrentVersion\OOBE /V BypassNRO /T REG_DWORD /D 00000001 /F
REG ADD HKLM\SOFTWARE\Microsoft\Windows\CurrentVersion\OOBE /V HideOnlineAccountScreens /T REG_DWORD /D 00000001 /F
REG ADD HKLM\SOFTWARE\Microsoft\Windows\CurrentVersion\OOBE /V DisableVoice /T REG_DWORD /D 00000001 /F
REG ADD HKLM\SOFTWARE\Microsoft\Windows\CurrentVersion\OOBE /V PrivacyConsentStatus /T REG_DWORD /D 00000001 /F
REG ADD HKLM\SOFTWARE\Microsoft\Windows\CurrentVersion\OOBE /V ProtectYourPC /T REG_DWORD /D 00000003 /F
netsh wlan set autoconfig enabled=no interface="Wi-Fi"
netsh wlan set allowexplicitcreds allow=no
netsh wlan set hostednetwork mode=disallow
netsh wlan disconnect interface="Wi-Fi"
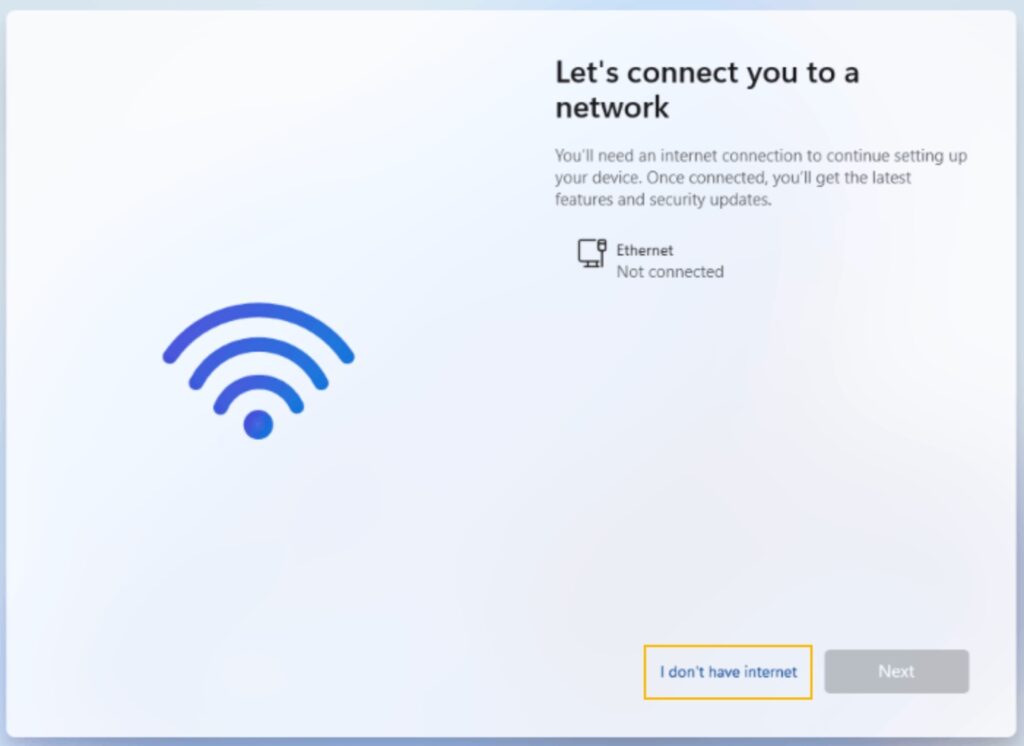
ENDLOCALAfter performing the above options, you will have ability to select ‘I don’t have Internet’ option to complete OOBE setup with local account:
That’s it!